TASK: Make a GIF animation of a fruit or vegetable transforming. (approximately 10-20 seconds in length)
1: I Love Peppers
Step 1: Experiment and make test photographs
Step 2: Whilst taking photographs, make incremental changes to your fruit or vegetable until it has been completely transformed or even destroyed (peel, shave, slice, bite, scratch).
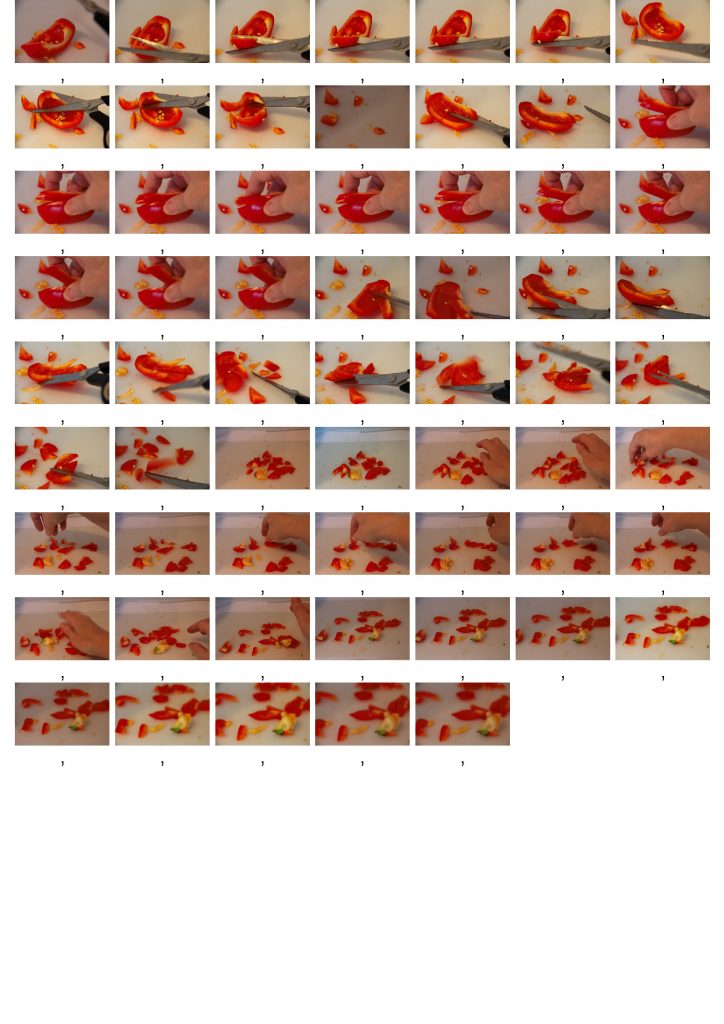
This was my fist ever StopMotion animation attempt. I was intrigued by the Jan Svankmajer animations ‘Dimensions of Dialogue’, ‘A Game with Stones’ and ‘Meat Love’ though aware that he had a whole studio of animators and experience supporting him. Normally for OCA ‘vegetable/kitchen projects’ I had chosen oriental mushrooms because of their anthropomorphic and expressive characteristics. But we had just received two beautiful red peppers in our organic veg delivery and they sat invitingly on the fridge shelf. I had always loved Edward Weston’s gnarled specimens in his black and white photographic series on Peppers: for one esample see https://www.artic.edu/artworks/120846/pepper but many more can be found on a Google search. My peppers were much more ‘dumpily feminine’ with lipstick red curves.
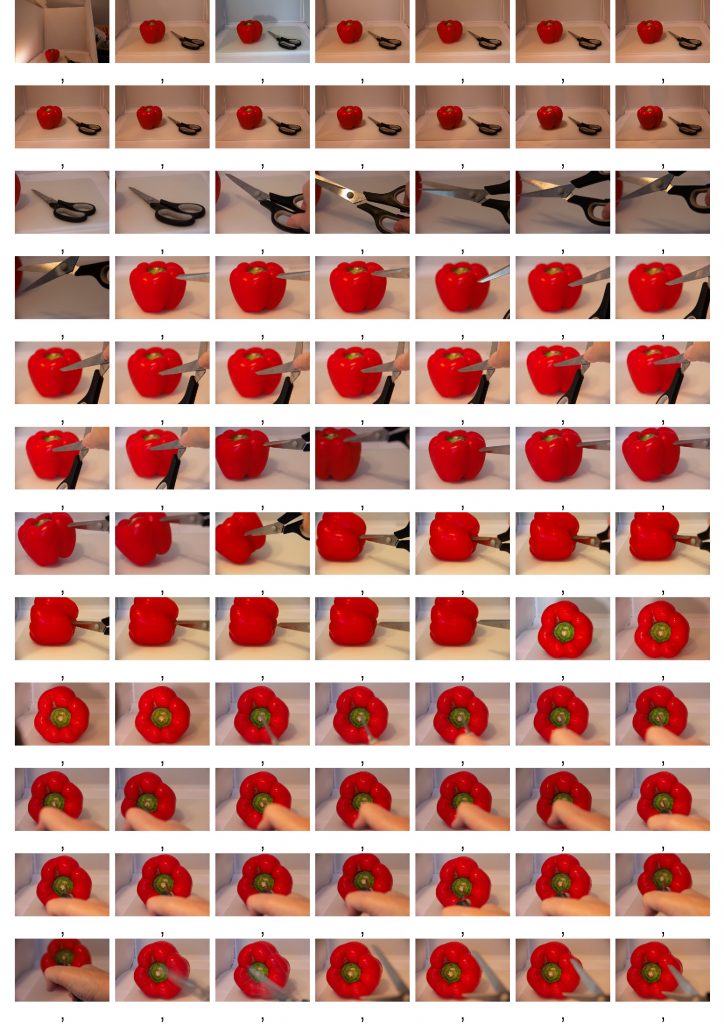
I started Step 1 with some very general ideas that could be adapted to my equipment and set up. I did a very quick sketch of ideas for movement from Svankmajer in my Notebook, but was not really sure whether these would be feasible for me to do on my own with my very rudimentary set up. So I decided to first jump right into Step 2 and experiment with one of the Peppers, using scissors rather than a knife and see how far I could replicate some of the Svankmajer effects.
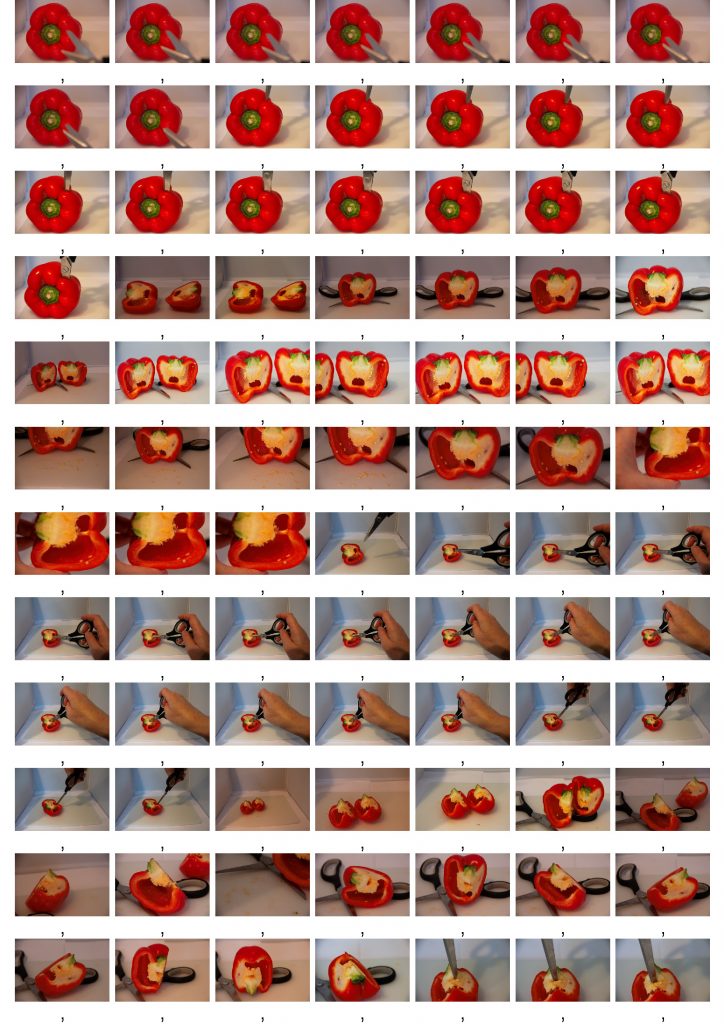
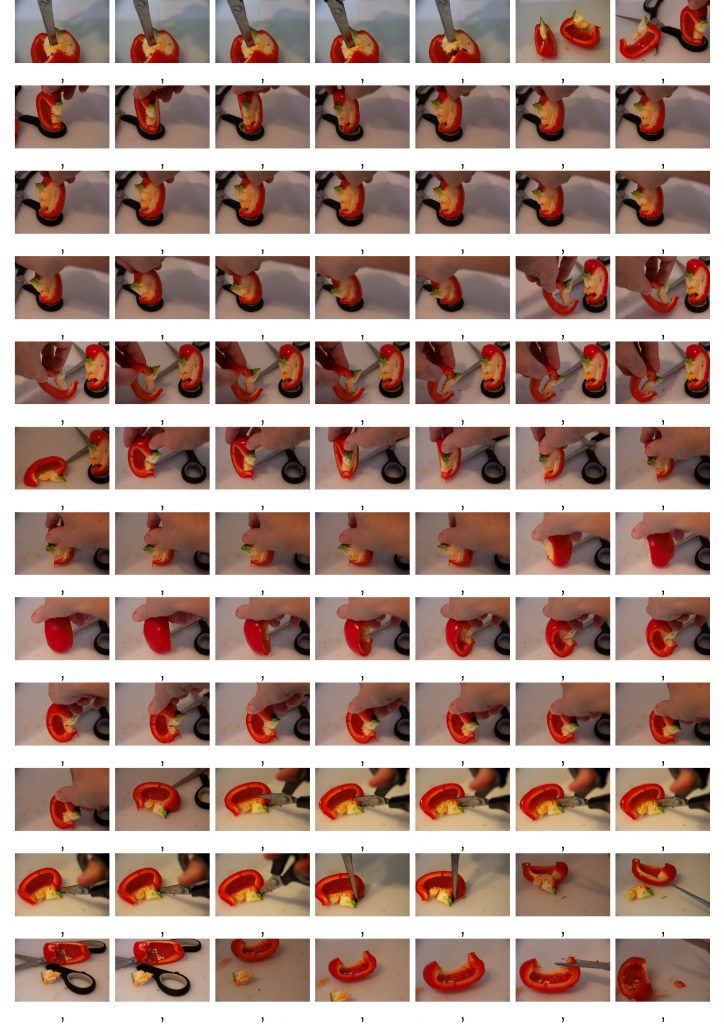
It was a cloudy day and I had a small photographic lightbox with small spotlights so I could control the lighting pretty well. I estimated that for 10-20 seconds of animation at 24FPS I would need 240-480 frames. I thought some of the images would be held for several frames or maybe animated in Premiere, and others would be very rapid. So a rough average of 2 frames per image, total 120 – 240. I systematically demolished part of my Pepper, prodding and poking and piercing as I divided into 2 halves, then as 1/2 halved to two 1/4, then one quarter was repeatedly cut up rather randomly and frenetically. I used a Zoom lens on my DSLR in Aperture mode, varying zoom, point of focus and shutter speed and a tripod. I photographed everything spontaneously as I went, trying to emphasise the different types of movement through slowing down or speeding up and maintaining consistency of position within sequences.
I basically just went with the flow – enjoying the prodding, poking and piercing as a release from the tensions of lockdown. I quickly realised that many of my ideas were more ‘continuous motion video’ than Stop Motion still sequence approaches. My ‘transformations’ were more ‘total destruction’ than ‘metamorphosis.’ I really needed proper equipment to hold the pepper and Stop Motion software with onion-skinning so that I could control the movements much more precisely, and get more variation in perspective etc.
But as I worked a number of ideas came tom me about the potential symbolism and themes that I might use in constructing a narrative for this animation:
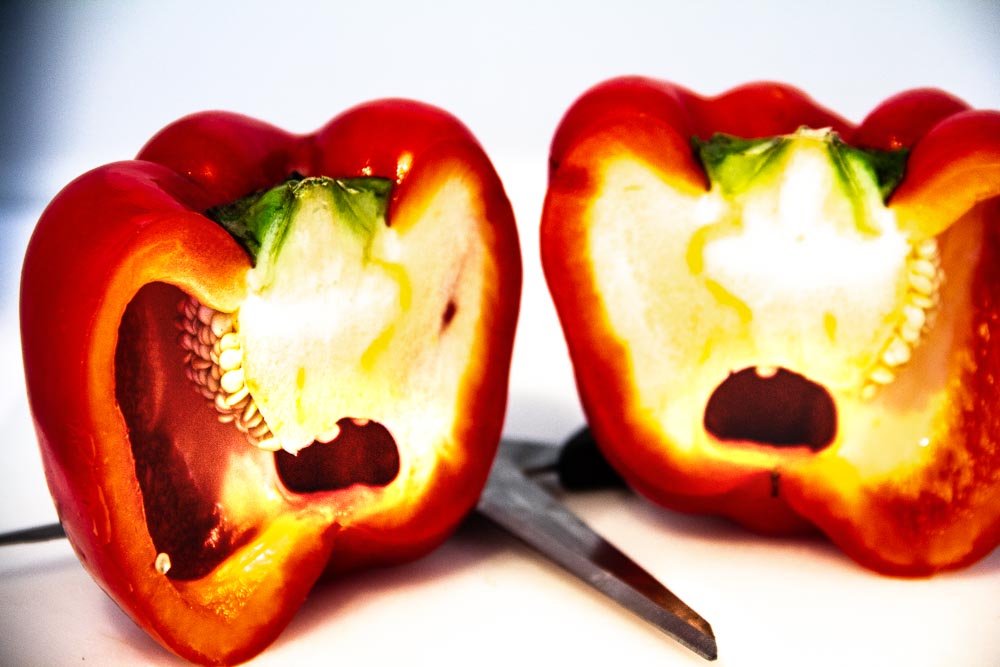
- I discovered just how sensuous and sexy my Pepper’s curves were – the shiny smooth buttocks and mouth shapes on the outside and the smushy flesh on the inside when cut up.
- The seeds inside were both eggs in a cocoon and also like tears.
- I discovered all the different vulnerable, scared and screaming faces, heads and body shapes that emerged as she was cut and sliced. And the very vulnerable goosebumps of the lighter flesh inside.
- I was also rather worried about the sadistic forces that seemed to have suddenly unleashed inside me. As I pierced with the scissors slowly then fast, and squashed bits together in images of submission between my fingers.
- The lightbox was also a very clinical white enclosed setting where violence could be perpetrated. Sometimes as if behind closed doors through the peephole of my lens. Other times like a beauty pageant with all on display.
- As photographer I was also an actor conceiving and controlling events.
I reviewed and made my first selections of images in Lightroom. And as I went through the title ‘I Love Peppers’ came to me – as an ambiguous statement about love, cruelty and potential for enjoyment of pent up anger and violence. This became the theme then underpinning the editing process.
I reviewed and made my first selections of images in Lightroom and colour synchronised them to improve white colour balance and slightly increase the saturation of the reds.
Contact sheets
I reviewed and made my first selections of images in Lightroom and colour synchronised them to improve white colour balance and slightly increase the saturation of the reds.


I also experimented with different processing and masking in Lightroom to emphasise colours and textures in different ways and sharpen areas of focus.


Step 3: Upload your images onto your computer
I decided to experiment with timing and sequencing in Adobe Premiere and went through a number of on-line training courses on lynda.com and You Tube to update my skills – I had not used Premiere for about 5 years. I imported the original image white/colour-balance corrected sequence as Tiff files at 24FPs and 0.50 seconds per frame as a starting point. In Premiere I organised the images into subclips according to stages in the narrative. I then worked with each of the subclips to vary and experiment with the speed and pacing, including some animation effects on the still images to get more movement. I also experimented with some hold frames and reversed loops.
Some of the image sequences when speeded up and put in a pingpong loop are actually quite smooth like video. The end on Red Pepper II with the very slowed down images was an accident because of rendering problems. But it gave me some further ideas for a slower and much sadder ending. Red Pepper III is better but it was very difficult to work with the large image files, and to predict how the looping and different animations and frame speeds would export, even when I pre-rendered subsequences and nests.
I think these images and ideas have potential to be developed further with animatics and sound in Part 2, despite the challenges in the photography process. Using a DSLR enabled a lot of experimentation with focusing etc. But the images still need a lot of editing work. I need to go back to Lightroom, put in more sequences and rework some of the images with final narrative in mind, and export from LR as smaller files to make the rendering and preview process much easier to be able to predict how the sequences will actually export. Some of the editing might be easier if I export straight sequences from Premiere to After Effects for the more complex animation, adding transitions etc.
I also ordered a gooseneck iPad tripod so that I can experiment with iStopMotion on my iPad in the following projects.
2: Haircut
Potato held in place. iPad and gooseneck tripod.
Step 4 (Optional): Make a 20-30 second animation by returning to your set up with locked camera in place and repeat the process with a different fruit or vegetable. Ensure that the [detritus] last shot is in the same position in the screen as the last shot of Step 2 to enable you to create the following illusion: change the names of your images or manually reverse their order in your editing timeline so that the images play in reverse order. Add this to your initial animated sequence and export.