Project Tag: Adobe Animate

  • E2.7-2.10: Pose to Pose Animation

    E2.7-2.10: Pose to Pose Animation

    Direct animation
    vs Pose to Pose

    Direct animation

    ‘Direct’ animation is an open-ended ‘adventure’ that starts by drawing, sculpting or photographing the first frame of the animation and then capturing each subsequent frame, progressively building up movement sequentially. This is the workflow of animation methods like Stop Motion and the Visual Music experiments. Although the process may follow some sort of storyboard and underlying narrative idea, the relationship between frames is not easy to control without a lot of practice, and not all accidents are ‘happy’.

    Pose to Pose animation

    ‘Pose to Pose’ animation is a more more controlled and considered approach to movement devised to ensure that the animated process can be planned for ahead of making; easily revised; and split up into a division of labour in commercial studios. It is possible to anticipate where a particular action might end and how long a particular action will take- useful when working alongside sound and in planning the overall rhythm and structure of a sequence. In hand or computer drawn animation, it is possible to make continual changes to the movement itself, returning to a sequence to insert or replace frames. A very jerky leap up and down can be changed to a slow glide into the air or a sudden crash downwards can be avoided by simply adding more frames into the upward movement and taking away a few frames towards the end of the movement. Or crashes and disasters exaggerated by removing or changing position of frames.

    E2.7 Time Chart

    To use pose to pose you draw the beginning and end of each main pose and any interesting ‘extreme’ poses between them (all known as keyframes) and then go back later to fill in the less dramatic frames in-between these keyframes (known as ‘inbetweens’). The more in-betweens you insert between an action the slower, and smoother it will become. It is not however the number of in-betweens between keyframes that matters, but their spatial and time distribution. If the in-betweens are equally spaced in time and distance then the resulting movement will be at a constant rate. If the spacing of time and/or distance is irregular then the movement will be more dynamic and lively.

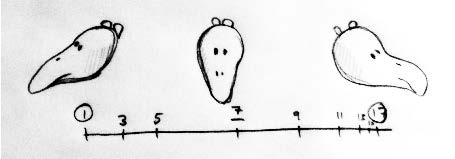
    A time chart is used to plan out the placement of the keyframes and in-between drawings.
    This image has an empty alt attribute; its file name is cg_mi4ani_Timechart.jpg
    Three key poses are pictured: 1, 7 and 17. Drawings 3, 5, 9, 11, 13 and 15 are planned on the timechart below the drawings. Note the distribution of in-betweens planned for frames 1-5 and 9-17. The dog’s head will move quicker between frames 1-7 because the spacing is further apart in the same time. It then slows down toward the end, between 7-17 with much less distance covered in the same time.

    TASK
    Draw an animation time chart indicating key poses and placement of
    in-betweens for two movements from the list below:
    ● A leaf falling from a tree
    ● Pin dropping on a hard surface
    ● Piece of paper being torn in half
    ● Coffee cup being knocked over
    Marble rolling off a table
    Ice melting
    Upload the charts onto your learning log.
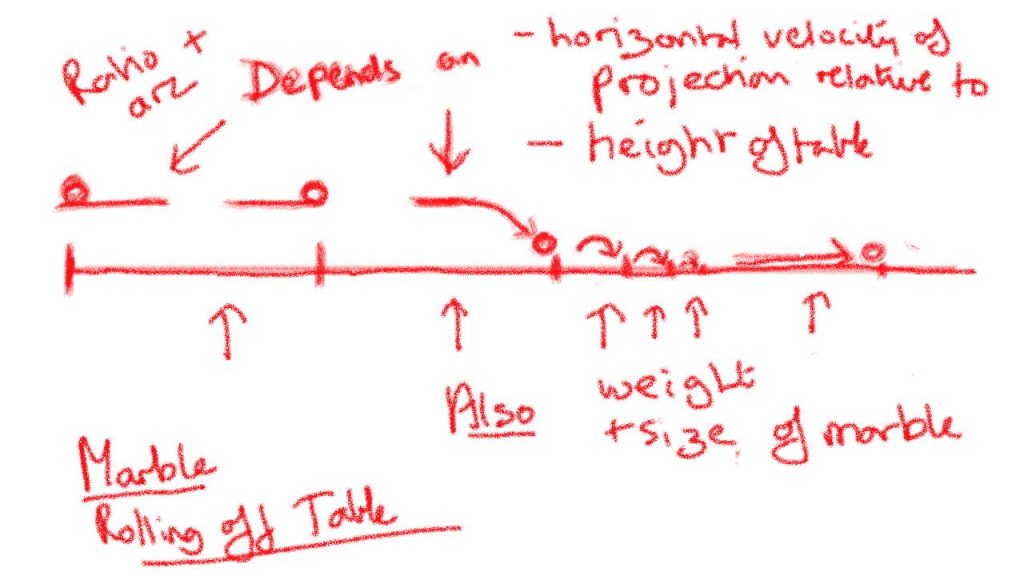
    Drawing showing the different factors that influence the behaviour of a marble – none of these timings are fixed but depend on how strongly the marble is rolled, the height of the table and whether the marble is big and heavy or small and lighter. See Post on Bouncing Balls and E2.9 below.

    Ice Cubes

    !!to do. Much more gradual. But do Inunclude all the details of the sudden cracks?

    E2.8 Keyframes and
    In-Betweens

    TASK: Draw the key frames and in-betweens of one of your chosen movements. Scan or photograph your frames to make an animation or animated gif. You may want to add extra frames or play the movement backwards and forwards making it into a loop.
    Upload the result onto your learning log as well as any amendments you made to your drawn diagram.
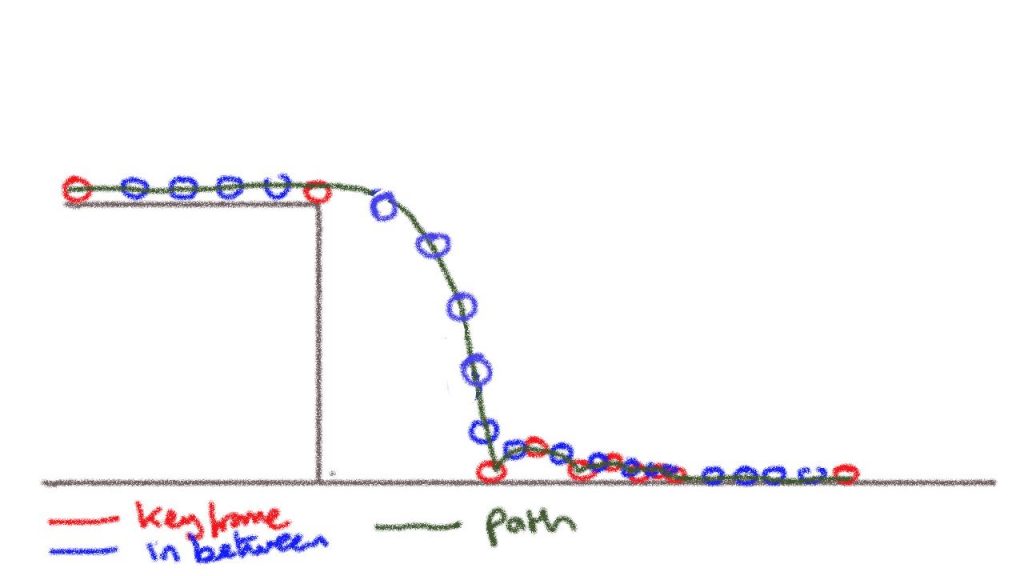
    Drawing of the keyframes and in-betweens based on 2 second animation and the time chart.
    TVPaint animation with handdrawn Keyframes in red and in-betweens in blue using FbF with speed adjustments to follow diagram. No squash and stretch was applied because marbles are hard and do not squash. I could have got more consistency in shape and size by pasting copies of a ball Custom Brush instead of handdrawing.

    E2.9 Interpolation

    Digital key frames and Interpolation

    2D computer animation is built up from key frames. If starting point A and an end point B are set as ‘key frames’ most software (Adobe Animate, TVPaint, Adobe After Effects, Adobe Premier and Final Cut Pro but not eg Procreate or Corel Painter) will be able to work out all the in-between stages needed to move from A to B. This process of filling in the in-betweens is called interpolation or ‘tweening’.

    There are two types of interpolation:

    • Linear interpolation will move an object from A to B at a constant rate as if the in-betweens were plotted on the time chart at equal distances from each other.
    • Bezier interpolation allows adjustment in the curve of movement so that the object will move at a variable pace: speeding up and slowing down.

    Software specifically designed to 2D animation enables either direct frame by frame drawing and/or importing drawings and images that can then be combined and animated with fine control over the interpolation curves.

    TASK:
    Watch the tutorials on linear and Bezier interpolation on the Khan Academy website:
    https://www.khanacademy.org/partner-content/pixar/animate/ball/v/a2-quick
    Complete the featured exercise ‘Animation with Linear Interpolation’ using their interactive animation page.

    I did not find the Khan Academy explanation particularly detailed compared to work I had done on another on-line animation course with Howard Wimshurst.

    I started by doing more thorough research on You Tube about the physics of Bouncing Balls and different approaches to animating them. Adobe Animate has much more precise and user-friendly motion tween features. But TV paint also enables motion tweening and some degree of control over the speed curves. Because I was interested in marbles for this project, again I did not add squash and stretch – though some motion blur might have been good. The Red Ball animation was done as part of my Howard Wimshurst course using Frame by Frame animation in Procreate on my iPad – a softer squishier ball using squash and stretch.

    See detailed post:

    Research 2.4 Bouncing Balls

    TV Paint animation using Motion effect and tweening comparing linear interpolation, Bezier C curve and Bezier S curve.
    Earlier animation using Procreate on my iPad

    E2.10 Keyframing

    TASK: Use digital software to animate one of the movements from the same list as in Exercise 7.
    ● A leaf falling from a tree
    ● Pin dropping on a hard surface
    ● Piece of paper being torn in half
    ● Coffee cup being knocked over
    Marble rolling off a table
    ● Ice melting

    Marble falling off a table using TV Paint motion tween features. I used the original keyframe drawing from E2.8 as a hidden layer. Because the speed controls in TV Paint are quite complex, designed for much more art-style animation rather than motion graphics, I found it difficult to control the interpolation speed at each keyframe. Adobe Animate would be better for this task, or TVPaint Frame by Frame using a ball Custom Brush to maintain consistency in shape and size. But the exercise was very useful in helping me familiarise myself with these features in TVPaint.

  • E2.6: Distorted and Exaggerated GIFs

    E2.6: Distorted and Exaggerated GIFs

    Movement observed, ‘captured’ and distorted

    An animator must imagine every aspect of the image and its motion. This reliance on imagination frees the animated form from the necessity of real life observations as in the early experiments with visual music. The history of commercial animation started with the studios set-up by the Disney brothers, Warner brothers and Max Fleischer in the early 1900s, Max Fleischer studios (creators of Betty Boop) were keen to explore the plasticity of drawn line and more experimental forms and Oskar Fischinger worked on Disney’s most experimental and inventive film, Fantasia.

    However commercial animation has predominantly been built on a highly representational approach. The decomposition and re-composition of real movements recorded by the camera became an integral part of Disney’s animation-making process, along with other studios at the time. Animators in Walt Disney studios would shoot live action films, make what they call ‘photostats’ (which were separate reprints of blown-up frames in the form of a flipbook) and study the movements frame-by-frame. Animators attended life-drawing classes, and used Edweard Muybridge’s sequential photographs of movement to study motions of animals (Muybridge was an English photographer important for his pioneering work in photographic studies of motion, and early work in motion-picture projection).

    However these techniques generally produce lifeless results that do not communicate clearly to the viewer. (see discussion of rotoscoping in Project 3.4) The questions of what to leave out and what short-cuts to take are the key creative decisions in making animation readable and also have emotional story-telling impact. Drawing classes at Disney and other studios therefore started to focus on more expressive principles of animation involving distortion, simplification and amplification of observed movement.

    TASK:
    Make at least three loops to explore the principles of ‘squash and stretch’ and ‘anticipation and overshoot’. Work fast, loose and expressively in any medium. Push your approach by overly distorting or exaggerating these movements, as well as refining them to their essential qualities.
    Upload your GIFs to your learning log along with any research.

    These principles focus particularly on:

    Instability of line: As a general rule, to add life to a drawing, the identity of line should be unstable. The unstable line implies movement, breath, what we know to be life-like as in the discussion of ‘Boil’ in Project E1.2 and Research 1.1.

    Exaggeration: The most common form of this exaggeration is known as ‘squash and stretch’ where a shape is distorted to indicate the impact of gravity and energy, and also to reflect the effects of motion blur in our perception of movement. Including a frame or two of anticipated movement where the first frame of the movement moves in the opposite direction of the
    movement to give an illusion that the movement is ‘self-motivated’. This also allows the viewer’s eye to momentarily register that a movement is about to take place so that it can be the point of focus and viewed without being missed. This is then enhanced further by frames of ‘overshoot’ and ‘follow-through‘ representing movement of items like clothing, tails, hair etc and attention to secondary movement.

    See detailed discussion of Disney animation principles on VisCom4Dev blog.

    Swarm Fireflies

    My first exercise was done in Adobe Animate in response to activities suggested on my on-line Animation Academy practical animation course with Howard Wimshurst. This involved experiments in timing and positioning of dots in relation to each other to create a ‘swarm’. Then experimenting with shape and lengthening the lines to create an illusion of rapid movement without strobing.

    This was very interesting in demonstrating that animation is not about producing a series of sequential still frames, but creating images that show movement in themselves. Many of which may well not make sense when viewed individually outside the running sequence.

    Stop Motion Squash and Stretch

    Animation principles in Frame by Frame animation are explored in detail in my OCA Visual Communications degree courses. So for the other two animations I decided to see how things might work using Stop Motion, building on my materials explorations different materials in E2.1 Material Performance and with peppers and cabbage in Part 1 and and E2.4 Lip Sync.

    These experiments were quite interesting, and could be effective with a comic or allegorical narrative and a more interesting background. But I need a lot more practice to get smoother movement and then edit with time remapping in After Effects or Premiere. I could also experiment more with lighting – physical and/or digital – as in Death of a Cabbage.

    Interaction of Chips: I had somehow imagined that chips would be fairly elastic in squashing and stretching, but I found they disintegrated quite quickly. This movement needs to either have smaller and more frequent movement – difficult because my hands wither moved the chips too much or were captured in the frame. And/or be speeded up with time remapping to give more dynamism and variety. But with more practice I think this has some potential if I can create a comic narrative and appropriate background and lighting.

    Tissue fight: I find this also quite interesting, but again I needed to make much smaller movements to make things smoother and less jerky and/or selectively speed up some of the frames. Gives the detailed convoluted shapes, it might be interesting also to see how to build on this in After Effects using distortion filters. Again with a clear narrative, background and lighting.